1. Setup Wizard: Use the Setup Wizard to select options such as a Points or Weighted Grading System.
Step 1: Choose Grading System - Choose a Weighted or Points based gradebook. A weighted gradebook assigns fixed percentages to each category and the sum of the category percentages need to add to 100%. Each category in a weighted gradebook needs to be edited to determine how the weight of the items within are distributed. Choose distribute weight by points to allow the gradebook to calculate the percentages automatically. If you want to drop the lowest grade(s), choose to distribute weight evenly. A points based gradebook is simpler and calculates percentages based on points earned divided by points possible. If you have already setup the points of your items to equal the percentages you want for each category, then use a points based system.
Step 2: Final Grade Released - Display the “Calculated Final Grade” in order to show the system calculated grade, which updates as grades are entered. If you decide later to adjust grades, you can change the setting to show the “Adjusted Final Grade.” The Adjusted Final Grade requires manual updating, so it is best to wait until the end of the course, if used. Choose "Automatically release final grade" if you want students to see the calculated grade (overall score earned so far). Otherwise, they will only see points for each item until you release the overall grade.
Step 3: “Drop ungraded items” means ignore items that have not been graded yet. It is important to add earned zeros to display an accurate current grade. Choosing "Treat ungraded items as zero" assigns a score of zero to all grade items until scored.
Step 4: The percentage scheme shows the percent score (i.e., 4/5 as 80%) when scheme is selected to display. Other Schemes can be added, such as a 4.0 grading scale. See the Schemes tab to setup a grading scale.
Step 5: The "Managing View" is the instructor view of grades.
Step 6: Student View Display Options. Determine how you want scores displayed to students. The Final Grade Calculation option is not the same as releasing final grades. It shows a small calculator with scores used for their grade.
2. Gradebook Settings: The “Settings" area repeats many of the Wizard steps with some additional features. Checking the box to repeat the Final Calculated Grade at the start of the user list is helpful so you won't need to scroll horizontally to the end of the spreadsheet. This setting is user-specific and won’t affect other instructor views in the course.
The Managing View Display Options will affect the instructor view of grades independently from the Student View Display Options. Select “points” to see points listed in the “Enter Grades” view. You can show points and percentage, or points and scheme, but not all three.
3. Manage Grades: Select "Manage Grades" to create New > Categories and Items. For Items, choose "Numeric" to assign points (this is used in most cases). Use the pull-down menu next to the category or item title to edit, grade, or view statistics.
Bulk Edit - To make multiple edits, select items (or select all) and click “Bulk Edit.” This is a great feature to check all values and for entering short names, which will make your spreadsheet view more compact. Students never see the short names. They view the long grade item names in a vertical grades list.
When creating categories for a weighted gradebook, it is important to choose a distribution option. Edit each category and select to distribute the weights by points or evenly across all items.
For a points based gradebook, it is best to uncheck “Distribute points” unless you want to drop the lowest grade(s).
4. Enter Grades: Select "Enter Grades" from the top menu, to enter scores by grade item (use the pull-down menu), or by student (click on a name).
Select "Switch to Spreadsheet View" to enter grades across all item.
Use short titles to minimize column widths, and use More Actions > “Hide/Show Columns” to customize your view. Hide/Show Columns does not affect the student’s view. Sometimes you can show more users per page if you show fewer items at a time.
Click on Last Name to sort by name. Click on a column heading to sort lowest to highest and vice versa. This is a fast way to find blank cells and enter zeros while in spreadsheet view. For large courses, use the search options from the item's "Enter Grades" view and set criteria to equal empty (leave field blank) and click the magnifying glass above to sort. Then "select all" and use the Set Grades option to enter zeros for all selected.
5. Connect and Assess Activities: To connect activities to the gradebook (e.g., Assignment, Quiz, or Discussion,) go to the activity’s settings and use the Grade dropdown menu. You can associate the activity with an existing grade item or create a new grade item. To remove an association, select “Remove from grades” for the New Assignment Creation experience, or select the top option in the grade item dropdown for a Quiz or Discussion (in the Assessment tab of the settings). You must remove the association if you want to delete the grade item.
To assess: Select “Assess Topic” to grade a Discussion, select “Grade” for Quiz attempts, and select “Evaluate” to assess Assignment submissions. You can also click on the activity icons in the Standard View of the "Enter Grades" screen. To publish scores to the gradebook, select Publish, or send scores in bulk by checking the boxes by submissions/attempts and select “Publish Feedback.”
6. Preview Student Grades: To see a preview of student grades, go to “Enter Grades” and click on the pull-down menu next to their name, then select "Preview." This view shows feedback comments you have given to the student. Use [ctrl]-P to print the individual student’s grades.
7. Release the Final Grade: By default, the overall grade (FCG) is not displayed to students until you release them (individual grades are displayed). To display the final calculated grade, use the pull-down menu next to “Final Calculated Grade” and select “Enter Grades.” Then use the pull-down by Final Grades at the top of the page and select “Release All.” An open eye icon will appear next to grades to indicate that students can see their final grade at the top of their grades list. There is a setting that can be marked to always release the overall grade automatically in the gradebook settings. See tip #11 if you need to release Adjusted Grades.
8. Create Schemes: Select “Schemes” and click on New Scheme to create a new grading scale. Reduce each minimum percent by 0.5 if you would like to allow for rounding. Once created, copy to any section by using More Actions > Copy (start in the section you want to copy to). Edit the Final Calculated Grade (or use tip #3 bulk edit from Manage Grades) to display the scheme.
9. Export Grades: From "Enter Grades," click on "Export" then select "Username" and sort by Last Name. For other details, select Points grade, Last Name, First Name, and Group Membership. For a more concise view, do not select “Grade Scheme" which adds an extra column for every item displaying the scheme for each (usually percentage earned). Select the grades to export, click on "Export to CSV" and Download when ready.
Note: You may select Export to CSV (comma separated value) or Export to Excel. Either file will open in Excel. The CSV file is preferred if you plan to make changes offline that can be imported back to Grades.
10. Import Grades: From "Enter Grades" click on "Import." From this page you can obtain a copy of a sample import file from D2L.
The sample file comes directly from D2L and does not show the MSU ID format, so the username column is not in the correct format. The column heading should still be Username as indicated, but the username itself should not be firstname.lastname -- it should be the MSUNetID without the @msu.edu included. Make sure your spreadsheet has the usernames included in this manner.
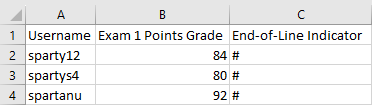
The words "Points Grade" spelled exactly that way but without the quote marks must be included in the column heading for each assignment you are importing. So, if you are importing an assignment that is called Exam 1 in your D2L gradebook, the column heading must be Exam 1 Points Grade on your spreadsheet.
Using the above assignment name as an example, if you have not created a grade item in your D2L gradebook called Exam 1 prior to import, you need to checkmark the box that says "Create new grade item when an unrecognized item is referenced" before clicking Continue along the Import process. Otherwise, D2L can't find an item in the gradebook that matches the item on your spreadsheet and doesn't know to create it, so it just does nothing, and your grades don't import.
Look very closely at the End-of-Line Indicator column to make sure the column heading is spelled correctly (upper and lower case, dashes, and spaces in the correct places), and make sure the pound signs in that column do not extend past the last row of the spreadsheet that contains student information.
A correctly formatted CSV file should look similar to the screenshot below.
Watch our video tutorial on Uploading Grades to D2L from a Spreadsheet for complete step-by-step instructions.
11. Switch Between Calculated and Adjusted Final Grade: You can only release the Calculated Final Grade or the Adjusted Final Grade, not both.
To release the Final Calculated Grade, go to “ Settings” and "Calculation Options" to make certain you are releasing the "Calculated Final Grade."
To release an Adjusted Final Grade, go to "Settings" and then “Calculation Options” to make certain you are releasing the "Adjusted Final Grade." Then use the pull-down by Final Grades to select "Transfer All." Make desired grade adjustments and select "Release All" to release the adjusted grades.
Recommended Printing Options:
There is no direct print option in the D2L Gradebook. First export the grades and then use Excel (or other spreadsheet) options to print or save as PDF.
On the "Home" tab of Excel:
Sort by Last Name: Select the column "Last Name" and click "Sort A to Z." Click "Sort" again when it asks to expand the selection.
Outline Borders: Highlight the data area (Click and drag mouse), then select the "All Borders" option from the borders icon pull-down menu.
Turn off "Wrap Text" for the title row if it was turned on.
On the "Page Layout" tab of Excel:
Minimize Page Margins: Choose Margins > Narrow
Print Landscape: Choose Orientation > Landscape
Repeat Names on each page: Choose Print Titles > “Columns to repeat at left,“ click the icon at the end of the field and then select the Last and First Name columns by clicking and dragging the mouse over them, close the pop-up window, and click "OK."